

Understanding the Importance of Lighting in Product Photography
Lighting plays a crucial role in product photography, acting as a determining factor for the quality and appeal of the images produced. Properly executed lighting can significantly enhance the details and colors of the subject, ensuring that products are presented in the most favorable light. This not only helps to attract attention but also assists in accurately portraying the product’s attributes, making them more appealing to potential buyers.
There are various types of lighting sources available in product photography, most commonly categorized into natural light and artificial light. Natural light, coming from the sun, offers a dynamic range of colors and soft shadows that can create a pleasing aesthetic. However, it is also dependent on weather conditions and the time of day, which can limit its reliability. On the other hand, artificial light provides greater control over brightness and direction, allowing photographers the flexibility to achieve their desired effects regardless of external factors. Understanding the nuances between these lighting types is essential for achieving stunning photographs.
Moreover, the psychology of lighting cannot be underestimated in marketing contexts. Good lighting helps to create a specific mood or atmosphere that can influence consumer behavior. For instance, well-lit products can evoke feelings of trust and quality, making customers more likely to make a purchase. Conversely, poor lighting can lead to unappealing images that misrepresent the product and diminish its desirability. By harnessing the power of strategic lighting techniques, product photographers can significantly improve their images, ensuring that they capture the attention of their audience and drive sales effectively.
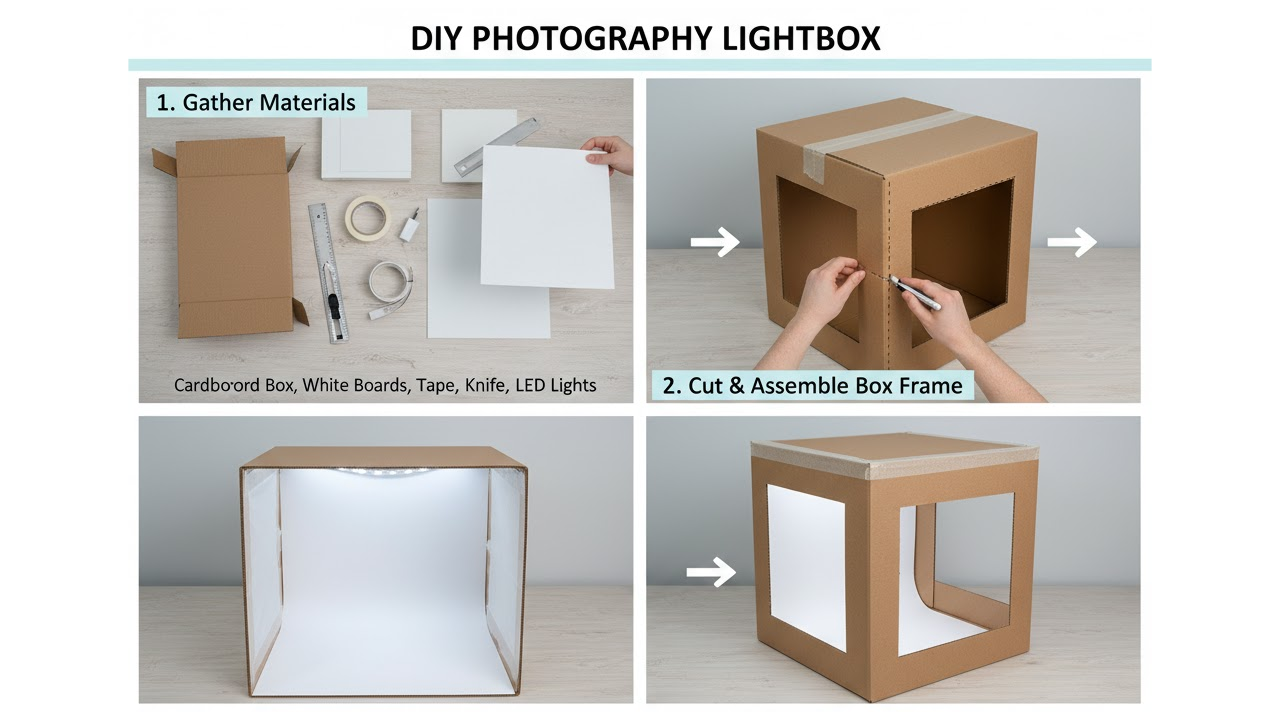
Gathering Materials for Your DIY Lightbox
Creating an effective DIY lightbox for product photography requires a selection of specific materials that come together to form this versatile tool. Ensuring you have the right supplies can significantly enhance the quality of your images while also making the assembly process smoother.
Firstly, the primary structure of your lightbox can be made from cardboard. It is lightweight, easy to cut, and provides sturdy support for your setup. You can usually find cardboard from old boxes or at local stores, making it an affordable choice. Remember to choose a size that suits your typical product dimensions, as you want enough space to capture your subjects without cramping them in.
Next, you will need a white sheet or fabric to create a translucent surface. This material will diffuse light effectively, softening harsh shadows and giving your photographs a professional touch. Cotton fabric or a white bed sheet can often be sourced from thrift stores or through online marketplaces, allowing you to obtain this component economically.
For lighting, LED lights or desk lamps are recommended for their energy efficiency and brightness. Look for those that emit a natural white light, as this will improve the color accuracy of your product images. Many home improvement stores or online retailers offer a range of affordable options. Additionally, you might already have lamps at home that could serve this purpose.
You will also need tape, scissors, and a cutting mat. Tape is essential for securing your cardboard pieces together, while scissors will assist in cutting the materials down to size. A cutting mat will not only protect your surfaces during assembly but also ensure that cuts are clean and precise. These items can typically be found at local craft or office supply stores.
By sourcing these materials carefully, you can keep your DIY lightbox project affordable and efficient, ensuring a successful start to your product photography journey.
Step-by-Step Guide to Constructing Your Lightbox
Creating a DIY lightbox can greatly enhance your product photography by providing a controlled lighting environment. To begin, gather the necessary materials, which include a large piece of cardboard, a utility knife, a ruler, a pencil, and translucent material such as white muslin or plastic sheets. A strong adhesive tape or glue will also be essential for securing different components.
Start by measuring and cutting the cardboard. For a standard size, consider dimensions of approximately 24″x24″x24″. Use a ruler to mark the dimensions on the cardboard, ensuring accuracy is key. Carefully use a utility knife to cut out the six pieces required: top, bottom, and four walls. Be sure to make straight cuts for a neat and professional appearance.
Once the main body is constructed, the next step is to create the translucent sides, which will allow light to diffuse evenly. Cut out windows on three sides of the cardboard walls, leaving a border of about two inches around the edges. These cut-out areas should be filled with the translucent material. Secure it in place using tape or glue to ensure it is adequately affixed and provides the desired light diffusion effect.
With the structure of your lightbox in place, it is time to secure your lighting setup. Position a couple of adjustable LED lights on either side of the box, ensuring they are sturdy enough in their placement to avoid accidents. Aim for a soft light that will not create harsh shadows on your products. Adjust the distance of the lights depending on the desired intensity.
Finally, ensure that you adhere to safety precautions when using cutting tools and adhesives. Keep your workspace clean and organized to prevent accidents during the construction process. Following this step-by-step guide will enable you to efficiently build a functional DIY lightbox to enhance your product photography endeavors.
Tips for Using Your Lightbox Effectively
Once your DIY lightbox is complete, the next step is to harness its full potential for product photography. Effective positioning of products inside the lightbox is crucial. Aim to center your items to draw the viewer’s attention. Adjust the height of the products to create a sense of depth, allowing for varied perspectives that can highlight different features. If your products have multiple angles worth showcasing, consider rotating them slightly to present those details, which can help demonstrate their functionality or design.
Lighting is among the most significant factors in photography, and experimenting with different lighting angles within your lightbox can elevate your images. For instance, placing a soft light source from above can create subtle shadows, adding dimension to flat surfaces. Alternatively, side lighting can enhance textures, making materials like fabric or wood appear more appealing. It is essential to adjust the intensity and direction of the light based on the product type, ensuring that it neither looks overly harsh nor washed out.
Incorporating props can also significantly enhance product visuals. Small items that complement your product, such as textured fabrics, greenery, or relevant accessories, can create a more attractive scene that tells a story. Just ensure that these props do not overshadow the main item, as the product should remain the focal point. Additionally, using a consistent backdrop can help maintain coherence in your photography series, allowing your audience to connect with your brand’s style.
Finally, consider post-editing techniques to further refine your images. Basic adjustments in color balance, brightness, and contrast can dramatically transform your photos. Taking the time to edit your images enables you to present your products in the most favorable light, ensuring they stand out in a competitive marketplace.