

In a world overflowing with fast fashion and disposable trends, the concept of upcycling offers a refreshing path forward. Upcycling involves taking old, worn-out items and giving them new life in a more valuable form, rather than simply recycling them into raw materials. It is a creative rebellion against waste, turning what might end up in a landfill into something functional and stylish. One of the simplest and most rewarding upcycling projects is converting old T-shirts into tote bags. These versatile carriers can haul groceries, books, or beach essentials, all while carrying a personal touch from your past wardrobe favorites.
Why focus on T-shirts? They are ubiquitous. Most people have drawers stuffed with faded band tees, outgrown souvenir shirts, or those impulse buys from concerts that never quite fit right. T-shirts are made of soft, durable cotton or blends that hold up well under sewing stress. Plus, their basic shape, a rectangular body with sleeves and a neckline, lends itself perfectly to bag construction. No advanced sewing skills are required; beginners can dive in with just a pair of scissors and some thread. This project not only declutters your closet but also sparks joy in the making process. Imagine slipping your hand into handles crafted from the hem of a shirt you wore to your first music festival. That is the magic of upcycling.
The Environmental and Personal Perks of Upcycling
Before we grab the scissors, let us consider the bigger picture. The fashion industry churns out over 100 billion garments annually, with a staggering portion discarded after just a few wears. Textile waste contributes to methane emissions in landfills and pollutes waterways with synthetic fibers. Upcycling counters this by keeping clothes in circulation longer. When you transform a T-shirt into a tote, you reduce demand for new production, which saves water, energy, and resources. A single cotton T-shirt requires about 2,700 liters of water to produce, enough for one person to drink for over two years. By reusing it, you make a quiet statement for sustainability.
On a personal level, upcycling fosters creativity and mindfulness. It encourages you to see potential in the overlooked. That stained gym shirt? It could become a rugged market bag. The oversized graphic tee from a family vacation? Perfect for a beach tote with sentimental value. Economically, it is a win too. Why spend $20 on a mass-produced canvas bag when you can craft one for free? Over time, these DIY efforts build skills, from basic stitching to pattern design, opening doors to more ambitious projects like quilts or aprons.
Communities worldwide embrace this ethos. From urban makerspaces in Brooklyn to eco-villages in Bali, upcycling workshops draw crowds eager to learn. Social media platforms buzz with #UpcycleYourWardrobe challenges, where users share before-and-after photos of their creations. Joining this movement not only diverts waste but also connects you with like-minded souls passionate about planet-friendly living.
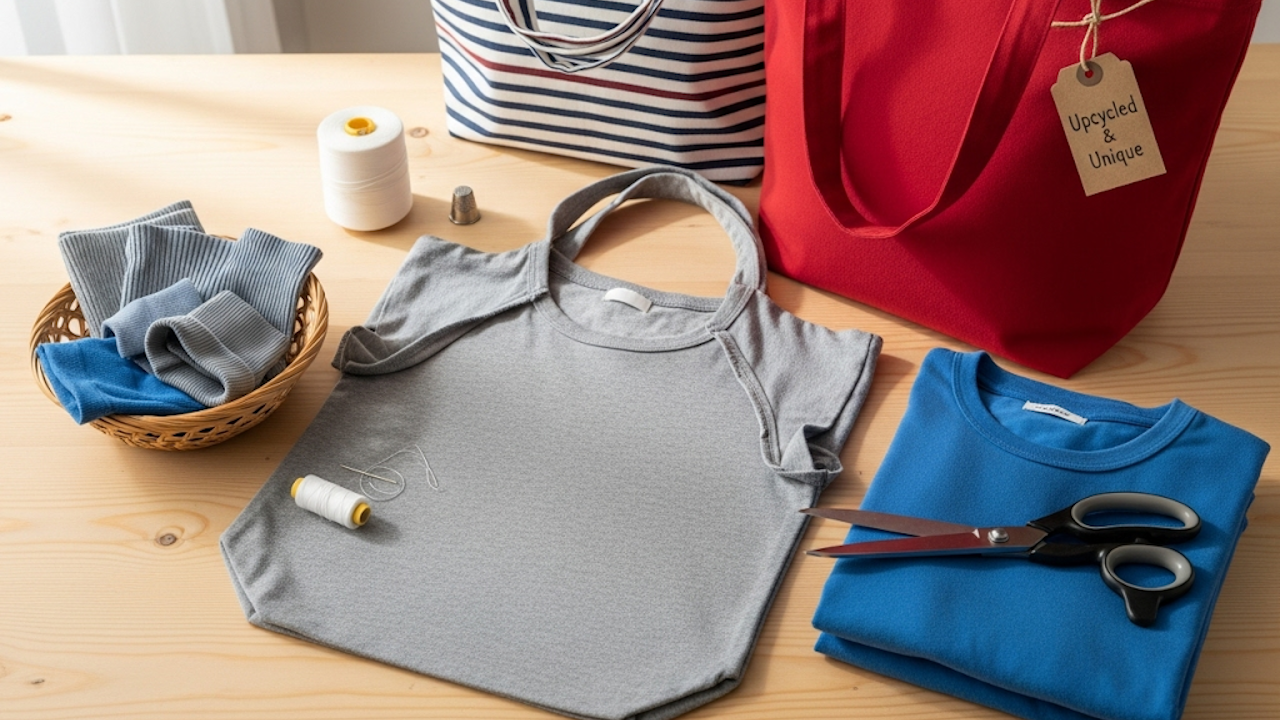
Gathering Your Supplies
Ready to start? Assembling materials for a T-shirt tote is straightforward and budget-friendly. Here is what you will need for a basic version:
- One or more old T-shirts (larger sizes yield bigger bags; aim for at least medium for a standard tote).
- Sharp fabric scissors (to avoid frayed edges).
- Sewing machine or needle and thread (hand-sewing works for beginners, but a machine speeds things up).
- Straight pins or clips (to hold fabric in place).
- Measuring tape or ruler (optional, for precise cuts).
- Iron (to press seams flat for a professional finish).
- Fabric markers or chalk (for marking cuts).
If you want to embellish, add embroidery floss, patches, or iron-on transfers. For handles, you can repurpose the shirt’s own fabric or use old belts or webbing scraps. Thrift stores overflow with T-shirts for pennies, making this project accessible even if your closet is slim on candidates.
Safety note: Work in a well-lit area to prevent slips with scissors. If using a sewing machine, unplug it when threading to avoid accidents.
Step-by-Step Guide: From Tee to Tote
Now, the heart of the project. This guide creates a simple open-top tote with shoulder straps. It takes about 30 to 60 minutes, depending on your experience level. We will use one T-shirt for the body and handles.
Step 1: Prepare the T-Shirt
Lay the T-shirt flat on a clean surface, front side up. Smooth out wrinkles with your hands or an iron on low heat. Decide on the bag’s size. For a standard tote (about 15 inches wide by 18 inches tall), you will use most of the shirt body.
Cut off the sleeves just inside the shoulder seams, creating armholes. Next, slice straight across the neckline, about 2 inches below the collar, to remove it entirely. You now have a tube-like piece of fabric.
Step 2: Cut the Body and Bottom
With the tube laid flat, measure and cut the bottom width. For a 15-inch-wide bag, cut across the bottom hem, leaving about 16 inches of height from the cut to the top edge (this accounts for seam allowance). To make a flat bottom, cut a 3-inch square from each bottom corner. These notches will form gussets when sewn, giving your tote depth for packing more items.
If using multiple shirts, layer colors or patterns for a patchwork effect. Pin pieces together before cutting to ensure symmetry.
Step 3: Create the Handles
Handles add strength and style. From the sleeve scraps, cut two long strips, each 4 inches wide by 24 inches long (adjust length for shoulder or hand carry). Fold each strip lengthwise, right sides together, and sew along the long edge with a 1/2-inch seam. Turn right side out using a safety pin or chopstick, then press flat with an iron. Topstitch along both edges for durability. These fabric handles blend seamlessly with the bag’s vibe.
For a no-sew option, braid three strips of T-shirt fabric into ropes and knot the ends. This rustic look suits casual totes.
Step 4: Assemble the Bag
Pin the side seams of the body tube, right sides facing in, from the bottom up to the top edge. Sew with a 1/2-inch allowance, using a straight stitch. For the gussets, match the side seam to the bottom seam at each corner, forming a straight line, and sew across. This creates the boxy base.
Turn the bag right side out and press all seams. Fold the top raw edge under by 1 inch, then another 1/2 inch, and sew around to hem neatly. This prevents fraying.
Step 5: Attach the Handles
Position handles 4 inches in from each side seam on the top edge. Pin securely, ensuring they sit evenly. Sew in place with a box stitch: forward, back, across, and back again for reinforcement. Test by tugging gently; handles should feel sturdy.
Step 6: Finishing Touches
Give the bag a final press. If desired, add pockets from pocket scraps sewn inside, or personalize with fabric paint. Let it air out if the shirt had any lingering scents.
Voila! Your tote is ready. Load it up and take it for a spin at the farmers market.
Creative Variations to Elevate Your Design
The beauty of upcycling lies in its flexibility. Once you master the basics, experiment with twists to match your style.
- Drawstring Tote: Skip the handles and add a casing at the top for a cord drawstring, made from the shirt’s hem. Ideal for gym gear or laundry.
- Ruffled or Fringed Edges: Leave the bottom hem intact for a casual fringe, or gather fabric at the top for ruffles using elastic thread.
- Multi-Shirt Mashup: Combine a graphic front panel from one tee with solid sides from another. Sew panels side by side before forming the tube.
- Insulated Version: Layer with an old towel or fleece scrap inside for a cooler bag perfect for picnics.
- Themed Totes: Upcycle event shirts into themed carriers, like a “vacation vault” from travel souvenirs.
For advanced makers, incorporate zippers from old jeans or add lining from pillowcases. Online tutorials abound, but the tactile joy comes from trial and error in your own space.
Troubleshooting and Pro Tips
Even seasoned crafters hit snags. Here are solutions to common issues:
- Frayed Edges: T-shirt fabric curls easily. Stabilize with zigzag stitches before main seams, or use pinking shears for cut edges.
- Uneven Seams: Measure twice, pin once. Use a seam guide on your machine for consistency.
- Weak Handles: Double up fabric layers or reinforce attachment points with extra stitching. Avoid thin knits for straps.
Pro tips: Wash and dry the T-shirt beforehand to preshrink fabric. Work with natural light for accurate color matching in multi-shirt designs. Store your tote flat to maintain shape. Over time, it will soften and patina beautifully, like a well-loved denim jacket.
If hand-sewing, use a thimble to push needles through thick layers. For machine users, a walking foot helps with slippery knits.
Beyond the Bag: Inspiring a Upcycling Habit
This T-shirt tote is just the gateway. Once hooked, you might tackle jeans into aprons or socks into plushies. Build a upcycling station in your home: a bin for fabric scraps, a corkboard for inspiration clippings. Share your makes with friends; gifting a custom tote strengthens bonds and spreads the ethos.
Schools and nonprofits weave upcycling into curricula, teaching kids resourcefulness alongside math (measuring) and art (design). In developing regions, initiatives like those from the UN’s Sustainable Development Goals empower communities to turn waste into income via market sales.
Challenges persist: not all fabrics upcycle easily, and scaling it industrially requires innovation. Yet, individual actions snowball. If every household made one upcycled item yearly, imagine the impact.
Wrapping Up: Carry On with Purpose
Upcycling old T-shirts into tote bags is more than a craft; it is a mindset shift. It reclaims value from the discarded, honors memories woven into threads, and lightens our collective footprint. Next time you reach for a plastic sack or ponder that drawer of relics, pause. Snip, stitch, and sling over your shoulder a piece of sustainable style.
Grab that old tee today. Your next adventure awaits, one repurposed stitch at a time. What will your first tote carry? The possibilities are as endless as your imagination.