

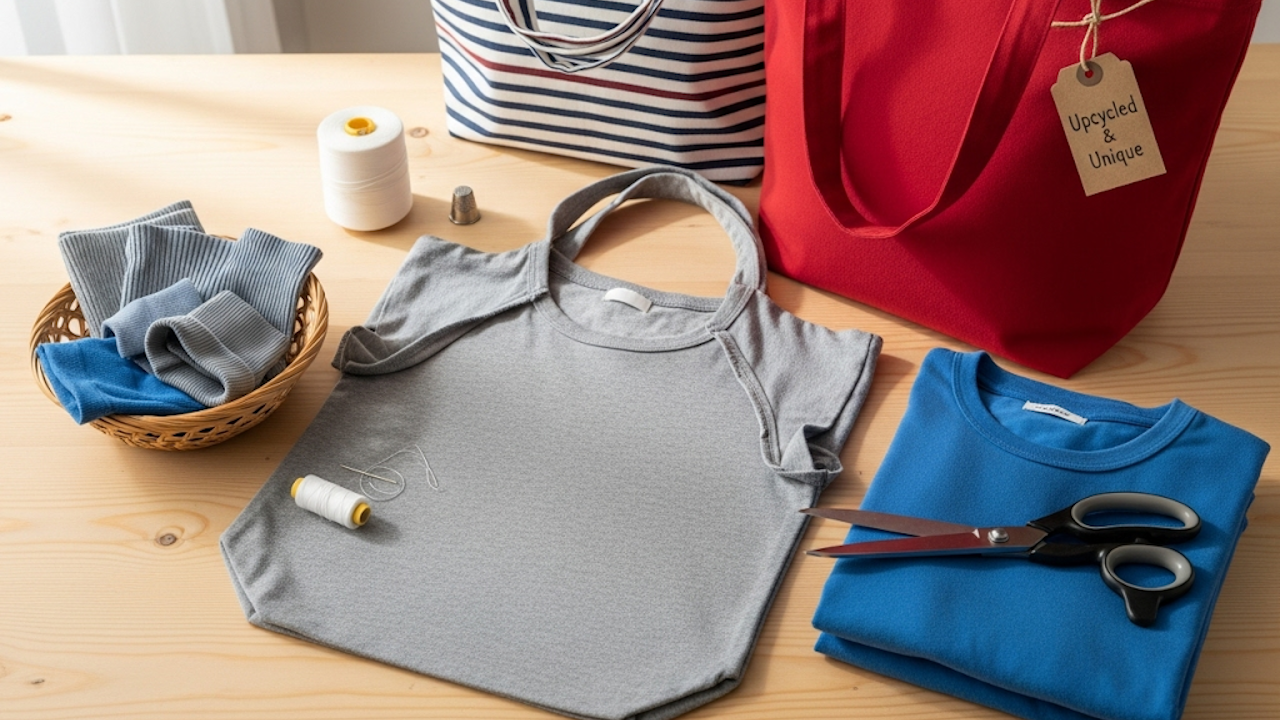
Upcycling has become a popular way for people to breathe new life into everyday items that might otherwise end up in the trash. Among the many creative projects in this space, transforming old T-shirts into sturdy tote bags stands out as one of the most practical and rewarding endeavors. This process takes something as simple as a worn-out shirt from your drawer and turns it into a functional accessory perfect for carrying groceries, books, gym clothes, or beach essentials. Not only does it reduce waste, but it also allows for personal expression through fabric choices and custom designs.
The appeal of this project lies in its accessibility. Almost anyone with basic sewing skills or even no-sew alternatives can participate. Old T-shirts are abundant in most households, often collecting dust after years of use or after a favorite band tour or event has passed. By upcycling them, you divert textiles from landfills where they can take decades to decompose. Textile waste is a significant environmental issue, with millions of tons discarded annually. Upcycling addresses this by extending the life of materials and cutting down on the demand for new production, which often involves resource-intensive cotton farming or synthetic fabric manufacturing.
Beyond the planet-friendly aspect, creating tote bags from T-shirts saves money. Store-bought totes can cost anywhere from a few dollars to over twenty depending on quality and branding. Homemade versions cost nothing beyond your time and perhaps some thread or basic tools you likely already own. Plus, these bags carry stories. A shirt from a family vacation or a concert becomes a daily reminder of memories while serving a useful purpose.
Why T-Shirts Make Excellent Tote Bags
T-shirt fabric, typically made from cotton or cotton blends, offers several advantages for tote construction. It is soft yet durable, lightweight for easy carrying, and flexible enough to fold into a small pouch when not in use. Many T-shirts have some stretch, which helps the finished bag accommodate various shapes and sizes of items without tearing. The knit structure of T-shirt material also means edges can be left raw in some designs because they resist fraying better than woven fabrics.
Different T-shirt types yield different results. Graphic tees with prints or logos create visually interesting bags that showcase personality. Solid-colored shirts provide a blank canvas for adding embroidery, paint, or iron-on transfers later. Larger adult sizes work best for standard shopping totes, while kids’ shirts can become smaller versions ideal for lunch bags or craft supply carriers. Even stained or holey shirts have potential if you position the damaged areas strategically or cut them away.
Materials and Tools Needed
To get started, gather these basic supplies:
- Several old T-shirts (at least two or three for a single sturdy bag if you want reinforced layers)
- Scissors or a rotary cutter for clean cuts
- Sewing machine (optional but recommended for speed and strength)
- Needle and thread for hand sewing
- Pins or clips to hold fabric in place
- Measuring tape or ruler
- Chalk or fabric marker for marking lines
- Optional extras: fabric paint, patches, ribbons for straps, or interfacing for added structure
No special equipment is required beyond these household items, making the project beginner-friendly. If you lack a sewing machine, hand sewing or even fabric glue can work for simpler designs, though machine stitching produces longer-lasting results.
Step-by-Step Guide to Making a Basic T-Shirt Tote Bag
Begin by selecting your T-shirt and preparing the workspace. Wash and dry the shirt if it has not been cleaned recently to remove any residues. Lay it flat on a table and smooth out wrinkles.
Step 1: Cut off the sleeves and neckline. Turn the shirt inside out for cleaner interior seams later. Use scissors to remove both sleeves, cutting along the seam where the sleeve meets the body. Next, cut away the collar in a gentle curve or straight line depending on the desired neck opening for your bag. For a wider tote mouth, cut lower toward the chest area. Aim for symmetry so the bag hangs evenly.
Step 2: Shape the bottom of the bag. With the shirt still inside out, fold it so the side seams align. Measure about 2 to 3 inches up from the bottom hem on each side and mark points. Cut straight across the bottom if you want a flat base, or create a boxed bottom for better stability. To box the corners, pinch each bottom corner into a triangle, sew across about 2 inches from the tip, and trim excess fabric. This creates depth so the bag can stand up when filled.
Step 3: Sew the sides if needed. Most T-shirts already have side seams, but reinforcing them adds durability. Stitch along the sides from the armhole cutout down to the bottom using a zigzag stitch on knits to allow for stretch. If hand sewing, use a backstitch for strength.
Step 4: Create straps. There are multiple ways to handle handles. One easy method uses the existing shoulder areas. After cutting the neck, the remaining fabric between the neck and sleeve cuts becomes natural straps. Simply sew them closed at the top edges if they are open.
For longer or adjustable straps, cut strips from the removed sleeves or an additional shirt. Cut two rectangles about 4 inches wide and 20 to 30 inches long. Fold each strip lengthwise with right sides together, sew along the long edge, turn right side out, and press flat. Attach these to the top edges of the bag by pinning them in place about 3 inches from each side seam, then sew securely with multiple rows of stitching to handle weight.
Step 5: Finish the top edge. Fold the top raw edge down about 1 inch toward the inside and pin it. Sew around the entire opening to create a clean hem. This prevents stretching out over time and gives a polished look.
Step 6: Turn the bag right side out and test it. Load it with some items to check balance and strength. Make adjustments like adding extra stitches if needed.
This basic method takes about 30 to 60 minutes once you have done it a few times.
Variations for Different Styles and Needs
The basic tote is just the starting point. Many crafters customize their creations extensively.
For a reversible tote, use two T-shirts of similar size. Sew them together with wrong sides facing, treating one as the lining. This gives you two looks in one bag and hides any interior seams.
Beach or market totes benefit from larger dimensions. Combine multiple shirts by cutting panels and piecing them like a quilt before assembling. This patchwork approach uses up smaller scraps effectively.
Add pockets for organization. Cut a rectangle from leftover fabric, hem the edges, and sew it onto the exterior or interior before final assembly. A simple divided pocket works well for keys or a phone.
For no-sew versions, use fabric glue or iron-on hemming tape for seams and edges. Cut strips for straps from sleeves and secure them with strong glue or by tying knots creatively. These are great for quick projects or when teaching children.
Heavy-duty versions incorporate interfacing or an additional layer of fabric between the T-shirt layers. This is useful if you plan to carry heavier loads like books or produce.
Creative Embellishments and Personalization
Make your tote uniquely yours with decorative touches. Fabric markers or paint can turn plain shirts into art pieces. Stencil designs, add iron-on letters for quotes or initials, or sew on buttons and beads for texture.
Embroidery offers a timeless touch. Simple running stitches or more complex patterns around the neck or on pockets elevate the bag from casual to special.
If the original graphics on the T-shirt are appealing, center them on one side of the finished bag. For shirts with holes or stains, position cuts to remove flaws or cover them with appliques made from other fabric scraps.
Tips for Success and Common Challenges
Choose T-shirts with minimal stretch for better structure, or preshrink them to avoid surprises after washing. Always reinforce stress points like strap attachments with extra stitching or bar tacks.
When working with printed shirts, test for colorfastness if you plan to wash the bag frequently. Dark colors might bleed onto lighter ones during initial washes.
Storage is simple. Fold the tote flat and keep several in your car or purse for impromptu shopping trips. They wash easily in the machine on a gentle cycle and air dry quickly.
Troubleshoot uneven straps by measuring carefully before cutting. If the bag twists when carried, check that seams are straight and sides are balanced. For fraying edges on very old shirts, use a serger if available or apply fray-check liquid.
Sustainability extends beyond the project itself. Source shirts from thrift stores, clothing swaps, or friends clearing closets. This keeps the cycle going and supports circular fashion.
The Broader Impact of Upcycling Projects Like This
Engaging in upcycling fosters mindfulness about consumption. Each bag represents one less item in a landfill and one less new product purchased. Communities often host workshops where participants share techniques and swap materials, building social connections around creativity and environmental awareness.
Schools and youth groups use this activity to teach sewing basics, responsibility for belongings, and the value of reuse. Adults find it therapeutic after busy days, turning screen time into hands-on making.
As interest in sustainable living grows, T-shirt totes have appeared in fashion shows, craft fairs, and online marketplaces. Some makers sell custom versions or offer patterns, turning a hobby into side income.
Conclusion
Upcycling old T-shirts into tote bags combines practicality, creativity, and environmental stewardship in one satisfying project. With minimal tools and endless customization options, it suits beginners and experienced crafters alike. The result is not just a bag but a statement about resourcefulness and care for the planet.
Next time you sort through clothes for donation or disposal, pause to consider the potential hidden in those faded tees. A few cuts and stitches later, you will have a useful accessory that carries more than groceries. It carries the satisfaction of creation and the quiet joy of making something from what others might overlook. Start small with one shirt, experiment with styles, and soon your collection of handmade totes will replace single-use plastics and store-bought bags in your daily routine. The process is forgiving, the rewards immediate, and the impact multiplies with every bag you complete.