

A lightbox, also known as a light tent, is an enclosed structure that provides soft, even, and diffused lighting for photographing small to medium-sized objects. It eliminates harsh shadows, reduces glare, and creates a clean, professional-looking background that makes products stand out. This tool is especially valuable for e-commerce sellers, hobbyists, crafters, and anyone who needs consistent, high-quality images of items like jewelry, electronics, cosmetics, food, or collectibles.
Building your own lightbox at home is a cost-effective alternative to buying professional equipment, which can cost hundreds of dollars. With basic materials and a few hours of work, you can create a functional lightbox that delivers studio-quality results. This guide walks you through the entire process in detail, from planning to advanced techniques. Whether you are a beginner or have some experience with DIY projects, you will find practical steps and tips to achieve great outcomes.
Why Use a Lightbox for Product Photography
Product photography demands clarity and consistency. Natural light can be unpredictable due to changing weather or time of day. Direct flash or harsh overhead lights create unwanted shadows and reflections. A lightbox solves these issues by surrounding the subject with diffused light from multiple angles. The translucent walls scatter light evenly, mimicking the effect of a professional softbox but at a fraction of the cost.
Key advantages include:
- Soft, shadow-free illumination that highlights product details.
- Neutral white or light-colored background for easy post-processing and background removal.
- Reduced reflections on shiny surfaces like glass, metal, or plastic.
- Repeatable results across multiple shooting sessions.
- Portability and storability for home or small studio use.
Many online sellers report that well-lit product photos increase customer trust and conversion rates. A good lightbox helps you achieve that professional edge without a large investment.
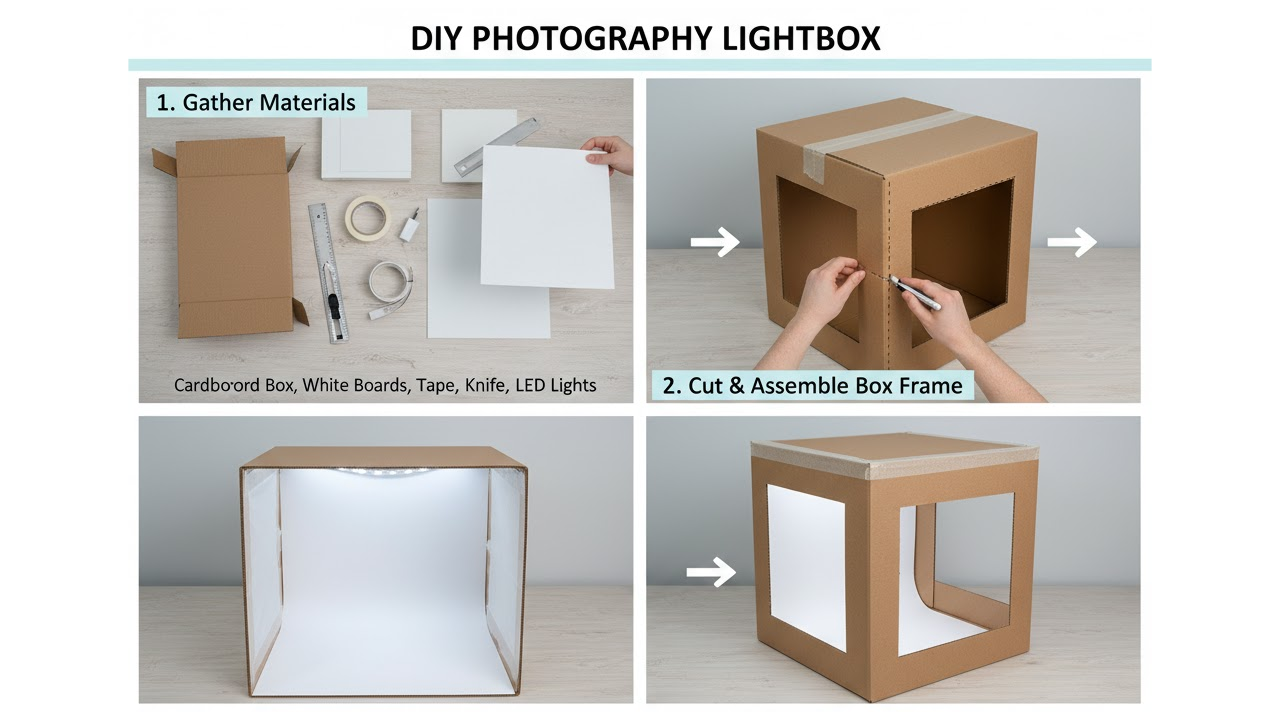
Materials You Will Need
Gathering the right materials is the first step. Most items are available at home, hardware stores, or online retailers. Here is a comprehensive list for a standard medium-sized lightbox suitable for products up to about 12 to 18 inches in size.
- A sturdy cardboard box (such as a shipping box from appliances or moving supplies). Aim for dimensions around 20 inches wide by 20 inches deep by 20 inches high, or larger if needed.
- White translucent fabric or material for the sides and top. Options include white bedsheets, muslin cloth, tracing paper, parchment paper, or white plastic tablecloths. Avoid colored materials that could tint your photos.
- White poster board, foam core board, or seamless white paper for the background and floor of the lightbox.
- Duct tape, packing tape, or hot glue gun and glue sticks for assembly.
- Utility knife or box cutter for cutting openings.
- Ruler, pencil, and measuring tape for precise markings.
- Lights: Two to four LED desk lamps, clamp lights, or photography LED panels. Choose daylight-balanced bulbs (around 5000K to 5500K) to avoid color casts. Avoid incandescent bulbs that generate too much heat.
- Optional but recommended: Black, gray, or colored backdrop papers for variety.
- Scissors and sandpaper for smoothing edges.
- Tripod or stable surface for your camera.
- Optional accessories: Diffuser sheets, reflector boards (white foam core), or a small turntable for 360-degree shots.
Budget estimate: Under 30 dollars if you repurpose household items. Scale up materials for a larger box if you photograph bigger products.
Planning Your Lightbox Design
Before cutting, decide on the size and configuration. A cube-shaped box works well for most uses. The front will have a large opening for the camera. One or more sides and the top will be covered with translucent material to let light in. The back and bottom will hold the white background sweep.
Consider your shooting space. A corner of a room with access to power outlets is ideal. Think about storage: Many designs are collapsible if you use cardboard flaps creatively. For permanence, reinforce corners with extra tape.
Sketch a simple diagram on paper showing where openings will go. Measure your products to ensure the interior space is adequate with room for lighting adjustments.
Step-by-Step Construction Guide
Follow these steps carefully for a durable and effective lightbox.
Step 1: Prepare the Cardboard Box Select a clean, undamaged box. Remove any flaps from the front side completely to create a large viewing window. This opening should be wide enough for your camera lens and hands to adjust the product inside. Leave the top and side flaps intact for now.
Reinforce the box by taping all seams on the inside and outside. This prevents light leaks and adds stability.
Step 2: Cut Openings for Light Diffusion On the left, right, and top sides, cut out large rectangular or square panels, leaving a border of about two to three inches around the edges for structure. These openings will be covered with translucent material. For the top, you can cut a large panel or multiple smaller ones depending on your lighting setup. Use the utility knife with steady pressure and a ruler as a guide. Sand any rough edges to prevent snags on fabric.
Step 3: Attach the Diffusing Material Cut pieces of white translucent fabric or paper slightly larger than the openings. Stretch them taut over the holes and secure with tape on the outside or inside. For fabric, double-layer if it is too thin to increase diffusion. Ensure there are no wrinkles, as they can create uneven light patterns in photos. Tape all edges securely so light cannot leak around the borders.
Step 4: Create the Background Sweep Cut a large sheet of white poster board or paper to fit the bottom and back wall. Curve it gently from the back wall down to the floor to create a seamless sweep. This eliminates the horizon line in photos, giving that floating product effect. Secure the sweep with tape at the back and sides, but leave the bottom free if you want to swap backgrounds easily. Avoid creases by rolling the paper gently before installation.
Step 5: Assemble and Test Stability Place the box on a sturdy table. Check that it does not wobble. If needed, add cardboard braces inside the corners.
Step 6: Set Up Lighting Position lights outside the box, aiming at the translucent panels on the sides and top. Use two lights on opposite sides for starters, or add a top light for overhead fill. Adjust the distance of the lights to control brightness and softness. Closer lights produce brighter but potentially less diffused light. Experiment with angles to fill in shadows. Turn off room lights during testing to isolate the lightbox effect.
Camera and Shooting Setup
Place your camera on a tripod in front of the opening. Use manual mode for full control. Recommended settings include:
- ISO 100 or 200 for minimal noise.
- Aperture f/8 to f/16 for good depth of field.
- Shutter speed adjusted based on histogram to avoid overexposure.
- White balance set to Daylight or Custom if possible.
Shoot in RAW format if your camera supports it for better post-processing flexibility. Use a remote shutter or timer to minimize camera shake.
Position the product in the center on the sweep. Use small props or blocks to elevate or angle it if needed. Check for reflections and adjust lights or add black flags (cardboard) to block unwanted light.
Tips for Better Results
Consistency is key. Mark light positions with tape on the floor for repeatable setups. Clean the interior regularly to avoid dust spots in photos. For small items like jewelry, use a smaller box or phone lightbox made from a plastic container. Experiment with colored gels on lights for creative effects, but keep them outside the box. If you notice hotspots, add another layer of diffusion or move lights farther away. Take test shots and review on a computer monitor for accurate color and exposure. Combine the lightbox with natural window light on one side for hybrid setups on very bright days.
Common Variations and Upgrades
Portable Version: Use PVC pipes and white fabric to build a collapsible frame instead of cardboard. This is lightweight and easy to store.
Larger Studio Lightbox: Scale up to refrigerator box size for furniture or clothing. Use multiple LED panels for even coverage.
Advanced Lighting: Incorporate continuous LED strips around the interior edges or battery-powered lights for outdoor use.
Backdrop Options: Keep multiple colored sweeps (black for dramatic shots, gray for neutral) stored nearby.
Turntable Integration: Place a lazy Susan or motorized turntable inside for product spins and 360-degree photography.
Troubleshooting Common Issues
Uneven lighting: Reposition lights or add reflectors inside the box using white foam core. Color casts: Use identical bulbs and set custom white balance. Shadows: Add a third light from the top or front. Wrinkled background: Replace the sweep or use steam on fabric versions. Overexposure: Dim lights or use neutral density filters on the camera. Low light: Increase exposure time with a tripod or add more powerful LEDs.
If results still disappoint, take photos of a plain white object to calibrate your setup.
Maintenance and Storage
Keep the lightbox in a dry area to prevent warping. Fold collapsible versions flat. Replace diffusion material if it yellows or tears over time. Periodically check tape seams for strength.
With regular use, your lightbox will become an indispensable tool in your photography workflow. Many users find they rely on it for nearly all product work after the initial build.
Expanding Your Skills Beyond the Basic Lightbox
Once comfortable, explore related techniques. Learn basic photo editing in free software like GIMP to remove minor imperfections or refine backgrounds. Study composition rules such as rule of thirds within the lightbox frame. Experiment with multiple lightbox setups for group product shots.
Consider documenting your builds and sharing them online to connect with other creators. Over time, you may invest in better cameras or professional backdrops, but the DIY lightbox foundation remains valuable for its simplicity and effectiveness.
Building a lightbox empowers you to take control of your product photography. The process teaches lighting principles that apply to many other areas of image making. Start simple, test thoroughly, and iterate on your design as your needs evolve. With practice, you will produce images that look professionally lit and help your products shine in any marketplace or portfolio.
This approach requires minimal tools yet yields impressive results. Dedicate time to fine-tuning, and your photography will improve noticeably. Happy shooting.