

Handmade journals offer a personal touch that mass-produced notebooks simply cannot match. Creating your own journal allows you to tailor every detail to your needs, whether you are a writer seeking a dedicated space for thoughts, an artist looking for a sketchbook with the perfect paper texture, or someone who wants a unique gift for a loved one. The process combines creativity, craftsmanship, and practicality, resulting in a functional item that reflects your style and personality. In this comprehensive guide, we will explore everything from gathering materials to finishing touches, providing clear instructions for beginners while offering ideas for more experienced makers. By the end, you will have the knowledge to produce beautiful, durable journals that you or others will cherish for years.
Why Choose to Make Your Own Journals?
Handmade journals provide several advantages over store-bought options. First, you control the quality of materials. High-quality paper, sturdy covers, and strong bindings ensure the journal lasts through frequent use. Second, customization is endless. You can select paper types suited for ink, watercolor, or mixed media. Third, the act of making a journal itself can be meditative and rewarding, turning the creation process into a creative outlet before the first page is even written.
Many people find that handmade journals encourage more consistent journaling habits because the book feels special and inviting. They also make thoughtful, personalized gifts for occasions like birthdays, holidays, or graduations. Environmentally conscious makers appreciate using recycled or sustainably sourced materials, reducing waste compared to commercial production.
Essential Materials for Handmade Journals
Before starting, gather these supplies. Quantities depend on the number and size of journals you plan to make.
- Paper for inner pages: Choose acid-free paper in various weights. For writing journals, 80 to 100 gsm printer paper or notebook paper works well. For art journals, opt for heavier watercolor or mixed-media paper around 140 to 300 gsm. You will need enough sheets to create signatures of 4 to 8 folded pages each.
- Cover materials: Cardstock, decorative paper, fabric, leather scraps, or recycled cardboard from cereal boxes or old book covers. Thicker materials provide better protection.
- Binding materials: Waxed thread, embroidery floss, or bookbinding thread. A strong needle such as a bookbinding needle or tapestry needle. Optional: a bone folder for creasing and an awl for punching holes.
- Tools: Ruler, pencil, scissors or paper cutter, craft knife, cutting mat, glue or double-sided tape, and clamps or heavy books for pressing.
- Decorative elements: Ribbons, buttons, beads, stamps, washi tape, or pressed flowers. These are for personalization after the basic structure is complete.
- Optional advanced supplies: Bookbinding press, leather punches, eyelets, or specialized adhesives like PVA glue for professional finishes.
Organize your workspace with good lighting and a flat surface. Protect the area with newspaper or a cutting mat to handle any mess from glue or cutting.
Step-by-Step Guide to Making a Basic Handmade Journal
This section walks through creating a simple stitched journal with a soft cover. The finished size will be approximately 5 by 7 inches, but you can scale the dimensions as needed.
Step 1: Prepare the Inner Pages (Signatures)
Start by folding your inner paper. Cut sheets to twice the desired height of the journal plus a small allowance for trimming. For a 5 by 7 inch journal, cut paper to 10 by 7 inches. Fold each sheet in half along the short side to form a folio. Nest 4 to 6 folios together to make one signature. A journal typically uses 3 to 6 signatures for a substantial thickness.
Use a bone folder or the edge of a ruler to crease each fold sharply. This ensures the pages lie flat when bound. Stack the completed signatures neatly and set them aside.
Step 2: Create the Cover
Cut two cover pieces from your chosen material, each measuring slightly larger than the inner pages. For our example, cut covers to 5.25 by 7.25 inches to allow for overhang. If using fabric, glue it to a stiffer cardstock backing for durability.
For a simple spine, cut a strip of cover material or book cloth about 2 inches wide and the height of the journal plus extra for folding over. Score lines where the spine will bend to make the cover flexible.
Step 3: Mark and Punch Holes for Binding
Align the signatures inside the cover to determine the spine position. Use a pencil to mark hole positions along the fold of each signature and the spine of the cover. Common patterns include three holes for a simple pamphlet stitch or five to seven holes for a longer journal.
An even number of holes works best for many stitches. Space holes about 1 inch apart, starting and ending 0.5 inches from the top and bottom. Use an awl or a thick needle to punch holes carefully through all layers of each signature and through the cover spine. Hold everything firmly to prevent shifting.
Step 4: Bind the Signatures to the Cover
Thread your needle with a length of waxed thread about three times the height of the journal. Use the kettle stitch or a simple coptic stitch for a sturdy binding.
For a basic three-hole stitch:
- Start from the outside of the cover at the middle hole.
- Go through the corresponding hole in the first signature.
- Bring the needle up through the top hole of the signature and back down through the cover top hole.
- Continue in a figure-eight pattern, linking signatures as you add them.
- End by tying secure knots on the outside or inside, depending on the style.
Pull the thread snug but not too tight to avoid tearing the paper. Repeat for additional signatures, ensuring they nest properly.
Step 5: Trim and Finish the Edges
Once bound, use a ruler and craft knife to trim the edges of the pages and cover for a clean, even look. A guillotine-style paper cutter gives the best results if available. Sand rough edges lightly with fine-grit sandpaper for smoothness.
Step 6: Add Closures and Decorations
Attach a ribbon or elastic band to the back cover for closure. Glue or stitch it in place. Personalize the front cover with stamps, drawings, or collage elements. Add pockets inside the covers by gluing smaller paper pieces to hold notes or mementos. Number the pages lightly in pencil if desired.
Press the completed journal under heavy books or in a book press overnight to help it lie flat and set the glue.
Variations on the Basic Design
Once comfortable with the basic method, experiment with different styles.
Hardcover Journals: Use book board for covers and book cloth for wrapping. This requires more precise measuring and corner folding techniques but produces a premium feel.
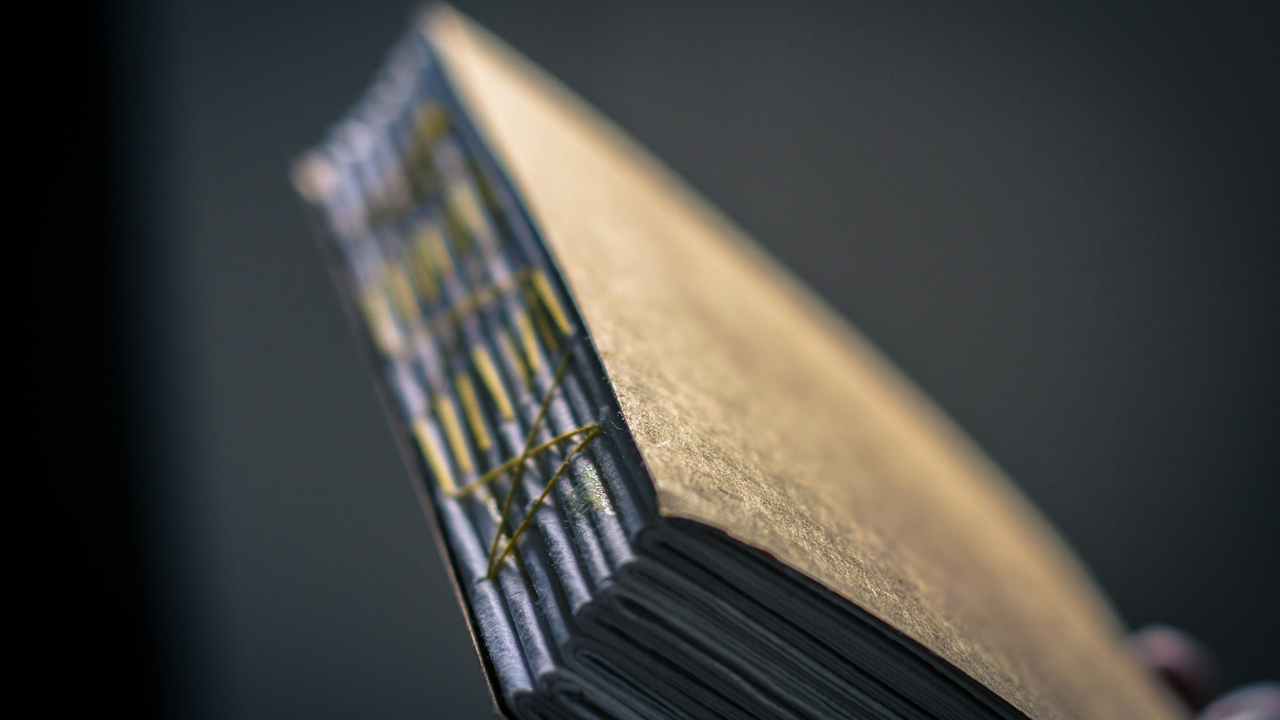
Coptic Stitch Binding: Ideal for lay-flat journals. Holes are punched along the edges of signatures and covers, and thread links them visibly on the spine for an attractive exposed binding.
Accordion Journals: Fold a long strip of paper in an accordion style instead of signatures. Attach covers to the ends. These work well for continuous drawings or timelines.
Miniature Journals: Scale everything down to pocket size using thinner paper and delicate stitching. These are great for travel or quick notes.
Recycled Material Journals: Create covers from old maps, sheet music, or denim jeans. Use scrap paper for inner pages to make eco-friendly versions.
Advanced Techniques and Embellishments
For more professional results, learn book edge gilding with gold leaf or painting edges with metallic ink. Incorporate watercolor washes on covers before assembly. Add headbands at the top and bottom of the spine for reinforcement and decoration using embroidery thread.
Experiment with different stitching patterns such as the long stitch or French link stitch. These create beautiful spine designs while maintaining strength. For art journals, leave some pages unnumbered and vary paper types within signatures for mixed media compatibility.
Tips for Success and Common Troubleshooting
Measure twice and cut once to avoid wasted materials. Practice on scrap paper before working with final sheets. If holes misalign, carefully repunch or adjust thread tension.
If the journal does not close properly, check for overly tight stitching or uneven trimming. Loose bindings can be fixed by adding more stitches or reinforcing with glue along the spine.
Store completed journals in a cool, dry place away from direct sunlight to preserve paper and bindings. For longevity, use archival-quality materials from the start.
Beginners should start small. Make several simple journals to refine your technique before attempting complex projects. Join online communities or watch tutorials for visual demonstrations of tricky steps, though hands-on practice remains the best teacher.
Caring for Your Handmade Journal
To maximize the life of your journal, handle it gently. Avoid overstuffing pockets or pressing too hard when writing. If pages become loose over time, a bit of archival glue along the spine can repair them.
Many makers keep a dedicated journal for different purposes, such as one for daily entries, another for travel sketches, and a third for idea brainstorming. This organization helps maintain inspiration.
Conclusion
Making handmade journals is a fulfilling craft that blends utility with artistry. From selecting paper to stitching the final signature, each step offers opportunities for creativity and learning. Whether you produce a single simple notebook or an entire series of custom books, the result is something truly unique. As you gain confidence, you may find yourself developing signature styles and techniques that define your handmade books.
Start with the basic guide outlined here, gather your materials, and enjoy the process. The satisfaction of writing or drawing in a book you created yourself is unmatched. With practice, your skills will grow, leading to increasingly sophisticated and beautiful journals. Happy journaling and crafting.