

Building your own bookshelf offers a rewarding way to create functional furniture tailored to your space and needs. Many traditional woodworking projects rely on nails for quick assembly, but it is entirely possible and often preferable to construct a sturdy bookshelf without them. By using screws, wood glue, dowels, and clever joinery techniques, you can achieve strong, long-lasting connections that enhance both the strength and the aesthetics of the piece. This approach avoids the visible holes or potential splitting associated with nails and allows for disassembly if needed in some designs. In this comprehensive guide, we will explore everything from planning to finishing, ensuring you can create a beautiful and durable bookshelf using nail-free methods.
Why Build a Bookshelf Without Nails?
Opting for nail-free construction provides several advantages. Screws offer superior holding power and can be driven precisely, making them ideal for load-bearing shelves. Wood glue creates permanent bonds that distribute stress evenly across joints. Dowels and other mechanical fasteners add reinforcement without the risk of nails working loose over time due to wood movement. Additionally, this method appeals to those who prefer a cleaner, more professional look or who want to experiment with traditional joinery skills. Whether you are a beginner or an experienced woodworker, avoiding nails encourages thoughtful design and precise craftsmanship, resulting in furniture that can last for generations.
Planning Your Bookshelf Project
Before gathering materials, take time to plan the dimensions, style, and intended use of your bookshelf. Consider the height, width, and depth based on available space and the types of books or items you plan to store. A standard freestanding bookshelf might measure 72 inches tall, 36 inches wide, and 12 inches deep, with shelves spaced 10 to 14 inches apart vertically for versatility.
Decide on the number of shelves. Five or six shelves provide ample storage while maintaining stability. Sketch your design on paper or use simple software to visualize the layout. Factor in the thickness of your lumber. Common choices include 3/4-inch or 1-inch thick boards for shelves and sides. Account for wood movement by allowing small gaps in floating shelf designs if applicable.
Choose a style that suits your home. A simple rectangular unit works well for modern spaces, while adding decorative elements like beveled edges or routed profiles can create a more traditional appearance. Think about whether you want a back panel for added rigidity or an open-back design for lighter weight.
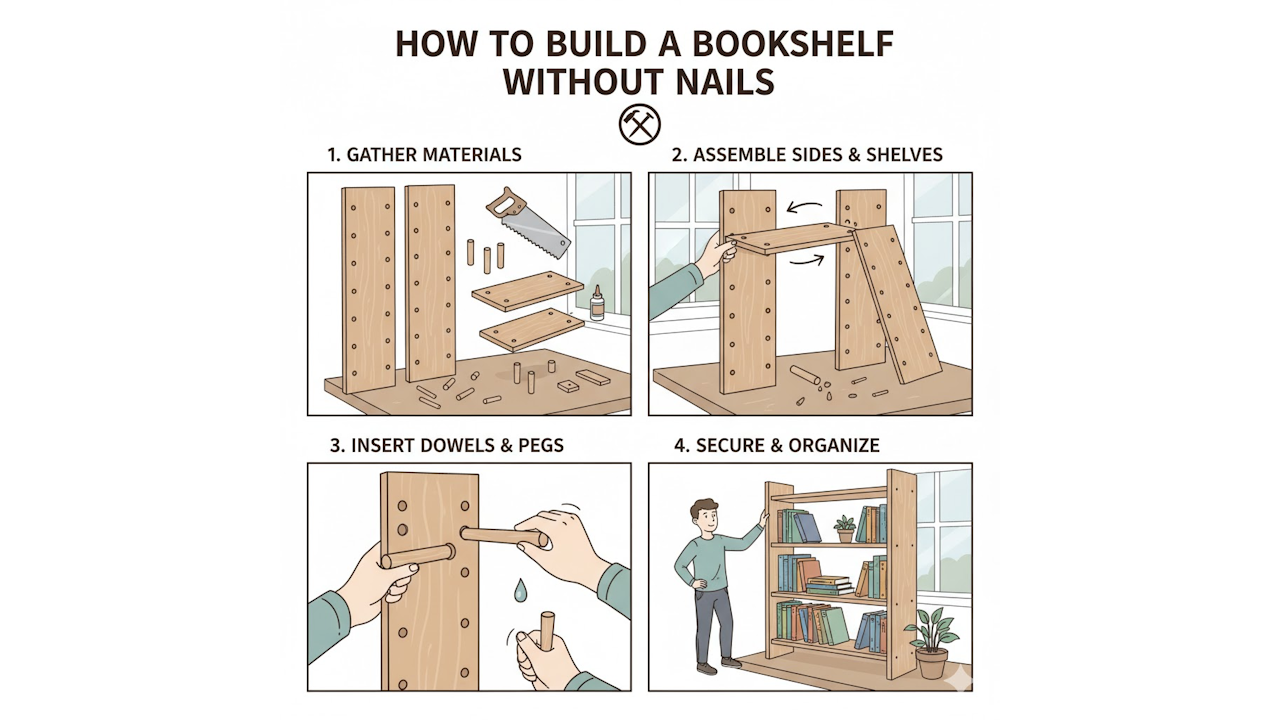
Materials You Will Need
Selecting quality materials is crucial for a successful nail-free build. Here is a list for a basic six-shelf bookshelf:
- Two side panels: 72 inches by 12 inches by 3/4 inch (pine, oak, or plywood)
- Six shelf boards: 34 inches by 12 inches by 3/4 inch (to fit between sides)
- One top board: 36 inches by 12 inches by 3/4 inch
- Optional bottom board for added stability
- One back panel: 36 inches by 72 inches by 1/4 inch plywood (for rigidity)
- Wood glue suitable for interior use
- Wood screws: 1-1/2 inch and 2-inch lengths, preferably with pilot holes in mind
- Wooden dowels: 3/8 inch diameter, cut to 1-1/2 inch lengths
- Shelf pins or supports if using adjustable shelves
- Sandpaper in various grits (120, 220)
- Wood finish: stain, paint, or clear sealant
- Edge banding or veneer tape for plywood edges
Source lumber from a reputable supplier to ensure straight, dry boards free of major defects. Plywood offers affordability and stability, while solid wood provides a premium feel but requires attention to grain direction.
Tools Required
You do not need an extensive workshop for this project. Essential tools include:
- Measuring tape and square for accurate markings
- Circular saw or table saw for cutting boards to size
- Drill and drill bits for pilot holes and countersinking
- Screwdriver or cordless drill driver
- Clamps of various sizes to hold pieces during glue-up
- Router with straight or decorative bits (optional for joinery)
- Mallet for tapping dowels
- Sanding block or orbital sander
- Level for final assembly checks
Safety equipment such as goggles, dust mask, and hearing protection is non-negotiable.
Step-by-Step Construction Guide
Step 1: Cut All Pieces to Size
Measure and mark your lumber carefully. Cut the side panels to 72 inches long. Cut shelves to 34 inches to allow for the thickness of the sides. Cut the top to 36 inches wide. Use a guide or fence for straight cuts. Label each piece to avoid confusion later.
For the back panel, cut it to fit the overall dimensions minus any overhang preferences.
Step 2: Prepare the Joinery
To build without nails, focus on strong alternatives. One reliable method combines screws with glue and dowels.
On the inside faces of the side panels, mark shelf locations every 12 inches from the bottom. For each shelf position, drill two or three pilot holes spaced evenly. Countersink them slightly so screw heads sit flush or below the surface.
For added strength, use dowels. At each joint, drill matching holes in the ends of the shelves and the sides. Apply glue and insert dowels for mechanical reinforcement.
If you prefer pocket hole joinery, use a pocket hole jig to drill angled holes in the shelf ends. This hides screws entirely from the front view.
For a more advanced approach, consider dado joints. Use a router or table saw to cut shallow grooves (about 1/4 inch deep) into the side panels where shelves will sit. The shelves slide into these grooves and can be secured with glue and screws from the outside if desired.
Step 3: Assemble the Frame
Begin assembly on a flat surface. Apply wood glue to the ends of the bottom shelf and attach it to the sides using clamps. Insert dowels where prepared. Drive screws through the pre-drilled holes, ensuring everything remains square. Check with a measuring tape across diagonals to confirm squareness.
Continue adding shelves one by one, working upward. Attach the top board in the same manner, creating a rigid box structure.
If using a back panel, apply glue to the edges and secure it with screws spaced every 6 to 8 inches around the perimeter. The back panel greatly enhances overall stability.
Step 4: Install Adjustable Features (Optional)
For flexibility, drill rows of 1/4-inch holes on the inside of the side panels at regular intervals. Insert shelf pins to support movable shelves. This allows customization without permanent fixed positions.
Step 5: Sanding and Finishing
Once the glue has cured (typically 24 hours), remove clamps. Sand all surfaces thoroughly, starting with 120-grit to remove imperfections and progressing to 220-grit for smoothness. Pay special attention to edges and corners for a refined feel.
Apply your chosen finish. If staining, test on scrap wood first to achieve the desired color. Follow with multiple coats of polyurethane or another protective sealant, sanding lightly between coats. This protects against moisture and wear from books.
Strengthening Techniques for Heavy Loads
Bookshelves must support significant weight. To maximize strength without nails:
- Use thicker material for sides and shelves if storing heavy volumes.
- Add a center support divider if the width exceeds 36 inches.
- Incorporate cross bracing or a full back panel.
- Ensure all joints are glued and screwed properly.
- Place the bookshelf against a wall and consider anchoring it securely to prevent tipping, especially in homes with children.
Test the structure by gradually adding weight during initial use.
Variations and Customizations
This basic design can be adapted in many ways. Build a corner bookshelf by mitering the sides at 45 degrees and joining with biscuits or dowels. Create a leaning bookshelf with angled sides for a modern look, relying on gravity and strategic screw placement for stability.
For a floating shelf effect, mount individual shelves directly to wall studs using hidden brackets or heavy-duty screws, though this differs from a freestanding unit. Incorporate decorative elements like crown molding at the top or base trim at the bottom, attached with glue and screws from hidden angles.
Smaller versions make excellent nightstands or display shelves, while scaling up creates library-style units. Experiment with different woods or paint colors to match your decor.
Common Mistakes to Avoid
- Rushing measurements: Double-check all cuts and markings.
- Insufficient clamping: Allow glue to set fully under pressure.
- Skipping pilot holes: This can cause wood to split.
- Uneven sanding: Leads to poor finish adhesion.
- Ignoring wood grain: Align grains for better appearance and strength.
If a joint feels weak, reinforce it immediately with additional screws or glue.
Maintenance and Care
A well-built nail-free bookshelf requires minimal maintenance. Dust regularly with a soft cloth. Check screws annually and tighten if necessary. Avoid overloading any single shelf. In dry climates, monitor for wood shrinkage and apply occasional conditioner if using solid wood.
With proper care, your bookshelf should provide decades of reliable service.
Conclusion
Constructing a bookshelf without nails is an accessible project that yields professional results through careful planning and execution. By relying on screws, glue, dowels, and thoughtful joinery, you create connections that are both strong and elegant. This method not only produces a functional storage solution but also builds your confidence in woodworking skills. Gather your materials, set aside a weekend, and enjoy the satisfaction of crafting something useful with your own hands. Your finished bookshelf will stand as a testament to creativity and craftsmanship, ready to hold treasured books and memories for years to come.