

Introduction to Nail-Free Construction
Nail-free construction is an innovative approach to building furniture that prioritizes sustainability and flexibility. This method emphasizes the use of materials and techniques that do not rely on traditional nails or screws, making it particularly beneficial for those who live in rental spaces or prefer a temporary solution. With increasing awareness of environmental concerns, the desire for eco-friendly building practices is on the rise. Constructing a bookshelf without nails allows for a reduction in the use of metal fasteners, which can contribute to overall waste in the manufacturing process.
Moreover, nail-free construction provides design versatility, enabling individuals to create aesthetically appealing pieces without compromising on functionality. Various techniques, such as woodworking joints, offer enhanced stability and strength while eliminating the need for nails. Joints like dovetails, mortise and tenon, and lap joints are not only reliable but also add intricate detailing to the final product, making the bookshelf visually engaging. In addition, incorporating adhesive solutions extends the possibilities for those who seek a cleaner, simpler look, as they can join materials together seamlessly and effectively.
Another compelling reason to explore nail-free construction is the modular design approach, which allows for easy assembly and disassembly. This is ideal for anyone who may need to relocate or reconfigure their space frequently. By employing modular techniques, you can construct a bookcase tailored to your needs while avoiding permanent fixtures that can damage walls or surfaces. In the subsequent sections of this guide, we will delve into specific nail-free building techniques and provide step-by-step instructions to help you successfully create your own bookshelf without the use of nails.
Materials and Tools Needed
Constructing a bookshelf without nails is a rewarding endeavor that requires a careful selection of materials and tools. The type of wood chosen is crucial; options such as plywood and solid hardwood are both viable. Plywood, known for its durability and resistance to warping, is an excellent choice for larger shelves, while solid hardwood offers an elegant finish for smaller projects. Each type provides unique aesthetic and structural benefits, allowing for customization according to one’s preference.
In addition to the wood, selecting the right adhesive is vital for the integrity of the bookshelf. Wood glue is commonly utilized due to its strong bond and ease of application. Additionally, epoxy can be employed for its remarkable strength, particularly in joints that may endure heavier loads. These adhesives not only eliminate the need for nails but also help maintain a clean aesthetic, as they remain hidden within the joints.
Finishing products play a significant role in the overall appearance and longevity of the bookshelf. Choosing between stain and paint can drastically affect the look and feel of the wood. Stains enhance the natural grain, bringing warmth and character, while paint offers a modern, sleek finish. It is advisable to apply a sealant after staining or painting to protect the surface from moisture and wear.
Equipping yourself with the right tools is equally important for this project. Essential tools include clamps to hold pieces together while the adhesive cures, saws for making precise cuts, and guides to ensure accuracy. Measurement tools should not be overlooked, as they provide the foundation for properly aligned joints. By gathering these materials and tools, anyone can successfully build a nail-free bookshelf that is both functional and visually appealing.
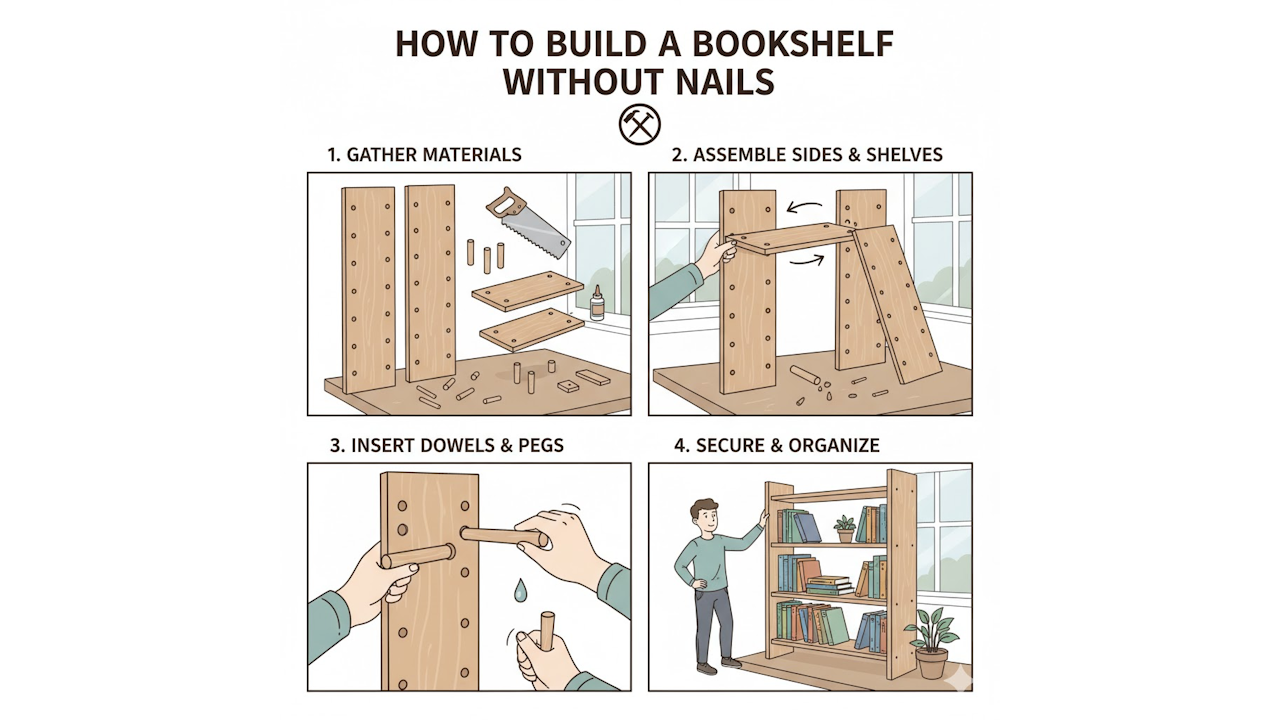
Step-by-Step Construction Process
Constructing a bookshelf without nails may seem daunting, but by following a systematic approach, you can create a sturdy and attractive piece of furniture. Start by designing your bookshelf layout. Consider the space you intend to place it in and determine the dimensions required. Sketch your design, keeping in mind the number of shelves and their intended use, whether for books, decor, or both.
Next, gather your materials. You will need quality wood, preferably plywood or hardwood, a saw, clamps, wood glue, and essential tools for measuring and ensuring precision. Once your design is finalized, measure the wood and cut it according to your specifications. Precision in these initial dimensions is crucial for a seamless assembly process.
As you prepare to assemble the pieces, various joinery techniques come into play. Dovetail joints provide excellent strength and are ideal for connecting shelves to the sides. Begin by cutting the dovetails at the ends of each shelf and the corresponding notches in the side panels. Alternatively, dowel joints offer a hidden connection method utilizing wooden dowels, which can enhance the aesthetics of your bookshelf. Drill in corresponding holes in the side pieces and shelves, then insert the dowels with wood glue to secure them firmly.
The pocket hole technique is another effective method for assembly. With this approach, inclined drill bits create holes in one piece, allowing screws to connect it to another without visible nails or bolts. Once you have joined the components, apply wood glue at all joints for reinforcement. Use clamps to hold pieces in place while the adhesive cures, ensuring a solid structure.
Throughout the assembly, be mindful of proper curing times for your adhesive, which is typically 24 hours for optimal strength. If you experience any alignment issues, gently adjust the components while the glue is still pliable. With patience and attention to detail, you will successfully assemble a beautiful, nail-free bookshelf suitable for any home. This process not only showcases your craftsmanship but also demonstrates the value of traditional woodworking techniques.
Finishing Touches and Maintenance
Once you have constructed your bookshelf without nails, the next step involves applying the finishing touches that can enhance both its aesthetic appeal and longevity. First, it is essential to ensure the surfaces of the bookshelf are smooth. Utilizing sandpaper, gently sand all exposed edges and surfaces to eliminate any rough patches. This process not only contributes to a polished appearance but also prepares the wood for staining or sealing, enabling better absorption of products and ultimately prolonging the life of the bookshelf.
After sanding, consider applying a stain or sealant. Stain can enhance the natural beauty of the wood, enriching its color and grain, while providing some level of protection. Alternatively, a clear sealant can create a barrier against moisture and wear. When choosing a stain or sealant, ensure that it is appropriate for the type of wood used in your bookshelf and that it is applied in a well-ventilated area. Typically, following the manufacturer’s instructions for application and drying time will yield the best results.
Regular maintenance is crucial to retain the bookshelf’s condition over time. It is wise to periodically inspect the structure for any signs of wear or damage. Simple cleaning using a damp cloth can help remove dust and grime, preserving both appearance and structural integrity. Additionally, rearranging the books and decorative elements can breathe new life into your bookshelf. Mixing different heights and textures creates visual interest, while personal touches reflect your unique style.
Building a bookshelf without nails not only demonstrates your resourcefulness but also contributes positively to the environment by utilizing sustainable practices. The journey from raw materials to a practical, stylized storage solution is tremendously rewarding, emphasizing craftsmanship and individuality in your space.