

Personalized mugs bring a special touch to everyday moments. Whether you sip coffee in the morning or gift a custom piece to a loved one, a mug with your own design feels meaningful and unique. Buying pre-made personalized mugs can get expensive, and the options often feel limited. That is where DIY comes in. Using paint pens on plain ceramic mugs lets you create one-of-a-kind pieces without special artistic skills or expensive equipment. This project works well for beginners and experienced crafters alike. It requires only basic supplies, a bit of time, and your creativity.
This guide covers everything you need to know. You will learn how to choose the right materials, prepare your workspace, plan and apply designs, cure the paint properly, troubleshoot issues, explore design ideas, and care for your finished mugs. By the end, you will feel confident making beautiful, lasting personalized mugs that brighten daily routines or make thoughtful gifts.
Why Choose Paint Pens for Mug Personalization
Paint pens offer control and convenience that brushes or regular markers cannot match. They deliver precise lines, smooth color, and easy application on curved surfaces like mugs. You can create fine details, bold lettering, or simple patterns without mess. Many paint pens come in vibrant colors, metallics, and whites that show up beautifully on light or dark mugs.
The DIY approach saves money too. Plain mugs from dollar stores or thrift shops cost very little. A set of quality paint pens lasts for multiple projects. You can make a single mug or a whole matching set for family, friends, coworkers, or events like birthdays, holidays, weddings, or housewarmings. Upcycling old mugs also reduces waste and gives new life to items you already own.
Beyond cost and creativity, the process itself brings joy. Many people find mug painting relaxing and meditative. It encourages experimentation with colors, words, and symbols that reflect personality or shared memories. Kids can join in with supervision for simple designs, turning it into a fun family activity. The result is functional art that gets used daily rather than tucked away.
Selecting the Right Supplies
Success starts with good materials. Begin with plain ceramic mugs. White or light-colored ones provide the best contrast for most designs. Dark mugs work too but require opaque colors like white, gold, or silver. Choose mugs without glossy coatings that might resist paint. Dollar store options or thrift store finds work perfectly and keep costs low. Inspect each mug for cracks or chips before starting.
The most important supply is the paint pens themselves. Look for oil-based paint markers or ceramic-specific paint pens. Popular choices include Sharpie Oil-Based Paint Markers and brands like Artistro or similar porcelain markers. These adhere well to ceramic and become permanent after proper curing. Avoid regular water-based Sharpies or standard markers because the design will wash away quickly.
Read the label carefully. Quality pens state they work on glass, ceramic, or porcelain. Some promise dishwasher safety after baking, while others recommend hand washing. Test a new pen on paper or a spare mug first to check flow and color. Shake the pen well before each use and press the tip several times to start the ink flowing smoothly.
Other helpful items include:
- Rubbing alcohol or isopropyl alcohol for cleaning
- Cotton swabs or Q-tips for fixing mistakes
- Nail polish remover for stubborn errors before baking
- Masking tape or painter’s tape for straight lines and sections
- Stencils, vinyl letters, or adhesive stickers as design guides
- A pencil for light sketching
- Newspaper or a drop cloth to protect your workspace
- A baking sheet for the oven
- An oven for curing
Optional extras are fine-tip and medium-tip pens for variety in line width, plus a clear sealant if your chosen pens recommend one. Gather everything before you begin so the creative flow stays uninterrupted.
Preparing Your Workspace and Mug
A clean, organized space makes the project easier and prevents accidents. Cover your table with newspaper or an old cloth. Work in a well-ventilated area, especially if using alcohol or pens with strong scents. Have paper towels and a small bowl of water nearby for quick cleanups.
Start by preparing the mug. Wash it thoroughly with warm soapy water to remove any dust or residue. Dry it completely with a clean towel. Next, wipe the entire surface, inside and out where you plan to paint, with rubbing alcohol on a cotton ball or paper towel. This step removes invisible oils from your hands or manufacturing that prevent paint from sticking properly. Let the mug air dry fully, which takes only a few minutes.
Remove any price stickers or tags completely. Residue can cause uneven paint application. If the mug feels cool or damp, wait longer before painting. A completely dry, oil-free surface gives the best results.
Planning and Sketching Your Design
Take time to plan before you touch the pen to the mug. Think about the recipient or the purpose. A name with a simple border works for everyday use. A favorite quote or inside joke makes a meaningful gift. Seasonal themes like hearts for Valentine’s Day, pumpkins for fall, or snowflakes for winter add timely charm.
Consider placement. Most people decorate the front or wrap a design around the body. Leave the handle and bottom clear for comfort and stability. Decide on orientation. Some designs look best when the mug sits on a table, while others shine when held in hand.
Sketch lightly with a pencil if you want guidelines. Keep lines faint so they do not show through light-colored paint. For lettering, practice on paper first to get spacing and size right. Use stencils or adhesive vinyl letters for perfect alignment on names or words. Position them, trace around the edges with dots or lines, then remove the stencil.
Simple designs often look most polished. A single word in elegant script, a row of hearts, or scattered stars can be stunning. More complex ideas like small landscapes or portraits require more practice but are achievable with patience and layering.
Applying the Paint Pens Step by Step
Once your design is planned, begin painting. Shake each pen vigorously for 30 to 60 seconds. Press the tip firmly on scrap paper until the paint flows evenly. Start with lighter colors or background elements if your design has layers.
Work in sections to avoid smudging. Hold the mug steady with one hand while drawing with the other. Apply even pressure for consistent lines. For filled areas, use short strokes or dots rather than heavy scribbling. Multiple thin layers build better coverage than one thick one and reduce the chance of drips.
If you make a mistake, act quickly. While the paint is still wet, wipe it gently with a cotton swab dipped in rubbing alcohol or nail polish remover. Let the area dry before trying again. Once dry, mistakes are harder to fix without affecting surrounding areas.
For dotted designs, which are popular and forgiving, create borders around stencils by making small dots close together near the edge and spacing them farther apart as you move outward. This creates a soft, professional look without perfect freehand skill.
Let each color dry slightly before adding adjacent colors if they might bleed. Most oil-based paint pens dry to the touch within minutes but need longer for full curing. Work slowly and enjoy the process. If the pen skips, shake it again and test on paper.
Drying and Curing the Design
After you finish painting, let the mug dry completely at room temperature. Most experts recommend at least 24 hours. Some pens suggest only one hour, but longer drying improves durability. Place the mug in a safe spot where nothing will touch the wet paint. Avoid direct sunlight or heat sources during this time.
Curing in the oven makes the design permanent and more resistant to wear. This step is essential for mugs that will hold hot drinks. Always follow the specific instructions on your paint pens because temperatures and times vary by brand. Here is a general method that works well for many oil-based and ceramic paint pens.
Place the painted mug on a baking sheet. Put it into a cold oven. Never put a cold mug into a hot oven or preheat the oven first, as sudden temperature changes can crack the ceramic. Set the oven to 350 degrees Fahrenheit, which is about 180 degrees Celsius. Bake for 30 to 40 minutes. Some methods use 300 degrees for a longer time or slightly different durations. Turn the oven off when the time is up and let the mug cool completely inside the oven. This gradual cooling prevents stress on the mug and paint.
Once cool, your mug is ready. The paint should feel hard and bonded to the surface. Test a small hidden area gently if you want extra peace of mind.
Troubleshooting Common Issues
Even careful crafters run into small problems. Here are solutions for frequent challenges.
If the paint beads up or does not stick, the mug was not cleaned well enough. Wipe again with alcohol and start over on that section after it dries.
Uneven lines or skipping usually mean the pen needs more shaking or the tip is clogged. Clean the tip gently on paper and try again with lighter pressure.
Smudges happen from handling wet paint. Work in stages and let areas dry before touching them. Use tape to mask off sections you are not currently painting.
Colors looking dull after baking is normal for some pens. The heat can slightly darken or change certain shades. Test colors on a practice mug to see the final effect.
If the design chips or fades after washing, the curing process may have been incomplete. Next time, ensure full drying time and proper oven temperature. Hand washing gently helps preserve any design longer than dishwasher cycles.
For very dark mugs, white or metallic pens provide better visibility. Apply extra layers if needed and let each dry fully.
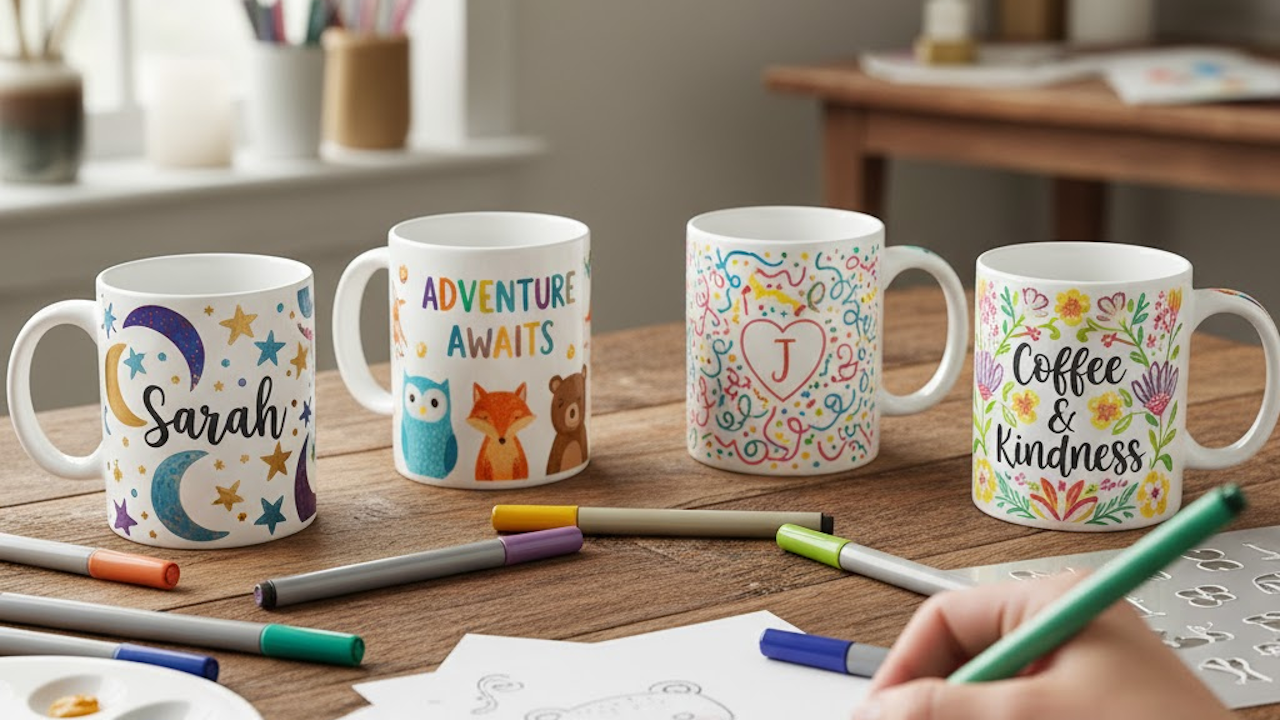
Inspiring Design Ideas
The possibilities are endless, but here are approachable ideas that work well with paint pens.
Monogram mugs remain timeless. Choose a large initial or full name in the center. Add a simple border of dots, dashes, or small shapes around it. Use two or three coordinating colors for depth.
Quote mugs bring daily motivation. Short phrases like “Good Morning” , “Coffee First” , or a favorite lyric look elegant in script or block letters. Pair the words with small icons like coffee beans, stars, or hearts.
Floral designs add softness. Draw simple flowers, leaves, or vines wrapping around the mug. Start with larger petals and fill in details. Different shades of the same color family create a cohesive look.
Geometric patterns suit modern tastes. Create triangles, chevrons, or repeating shapes using tape as a guide for straight edges. Alternate colors for visual interest.
Themed sets make wonderful gifts. Make matching mugs for a couple with their names and wedding date. Create a set for siblings with shared inside jokes or birthstones represented by colors.
Seasonal options keep things fresh. Spring flowers, summer suns, autumn leaves, or winter snowmen each take on new life when personalized. Holiday mugs with “Merry Christmas” or family names become keepsakes.
Pet portraits or simple animal faces work if you keep them stylized rather than realistic. A paw print, fish, or bird silhouette paired with a name creates a sweet tribute.
Dotted art is beginner-friendly and forgiving. Cover sections with clusters of dots in varying sizes and colors. It looks intricate without requiring advanced drawing skills.
Caring for Your Finished Mugs
Proper care extends the life of your designs. After curing, the paint is bonded but still benefits from gentle treatment.
Hand wash with warm water and mild dish soap. Use a soft sponge and avoid abrasive scrubbers or steel wool that could scratch the surface. Dry immediately with a soft towel.
While many baked designs withstand occasional dishwasher use on the top rack, repeated cycles can cause fading or chipping over time. For best longevity, hand washing is the safer choice. Some specialized ceramic paint pens claim full dishwasher and microwave safety. Always check the product instructions for your specific pens.
Avoid soaking the mug for long periods. Do not use it in the microwave unless the pens and curing process explicitly allow it. The high heat can affect the paint bond.
Store mugs carefully so they do not knock against each other. If stacking, place a soft cloth or paper towel between them.
With good care, your personalized mugs can last for years of daily use and bring smiles every time they are picked up.
Advanced Tips and Variations
Once you master the basics, try these enhancements. Layer colors for shading and dimension. Add fine details with a thin-tip pen after the base design dries. Incorporate negative space by leaving parts of the mug unpainted for a clean, modern effect.
Create matching sets by repeating elements across several mugs with slight variations. Make a family set where each member has their name in the same style but different accent colors.
Experiment with mixed media. Some crafters add small rhinestones or glitter accents with craft glue after baking, though this reduces dishwasher compatibility.
For a different texture, try blending colors while wet or using the side of the pen tip for broader strokes. Practice on paper to discover new techniques unique to paint pens.
If you want even more durability, look into dedicated porcelain or ceramic paint marker sets that come with their own baking instructions. These often produce results closer to professional pottery painting.
The Joy of Creating and Gifting
Making your own personalized mugs connects you to the creative process in a tangible way. Each brushstroke or pen line carries intention. The finished piece carries your personal stamp in a way mass-produced items never can.
These mugs make excellent gifts because they show time and thought. Wrap one with a bag of specialty coffee or tea for a complete present. Give a set to new homeowners or a new parent. Teachers appreciate custom mugs with their name and a small apple or book motif.
Document your creations with notes on what worked well. Over time you will develop a signature style. Share your projects with friends or online craft communities for inspiration and feedback.
The beauty of this hobby is its accessibility. You do not need a studio or years of training. A few dollars in supplies and an afternoon can produce something beautiful and useful. Every mug you make builds confidence for the next one.
Final Thoughts
DIY personalized mugs with paint pens combine practicality, creativity, and sentiment in one simple project. From choosing supplies and preparing the surface to applying designs and curing them properly, each step builds toward a finished piece you will be proud to use or give. The techniques are straightforward enough for anyone to try, yet flexible enough for endless variation.
Whether you make one mug for yourself or a dozen for loved ones, the process brings satisfaction and the results bring daily delight. Start with a simple design on an inexpensive mug. See how the paint flows and how the oven transforms it. Before long you will have a collection of custom drinkware that tells your story one sip at a time.
Embrace the imperfections that come with handmade items. They add character. With practice, your skills will grow and your designs will become more refined. Most importantly, have fun. The kitchen table or craft space becomes a place of joy when you are bringing color and personality to something as ordinary and beloved as a coffee mug.
Now gather your pens, pick a mug, and begin. Your next favorite cup is waiting to be created.